How to Make Coffee with an Aeropress
We're stepping into the world of the Aeropress—a nifty little gadget that's about to revolutionize the way you brew your favorite cup of joe. Picture it as your coffee's best friend, promising a quick, flavorful journey from bean to brew. In this blog, we'll uncover the Aeropress's origin story, its perks, and how it earned its spot as a game-changer in the coffee universe. Whether you're a coffee novice or a seasoned sipper, get ready to dive into the wonderful world of Aeropress brewing. It's about to make your coffee routine a whole lot more exciting!

History of the Aeropress Coffee
Embark on a journey back to the early 2000s, a pivotal period in the coffee world that introduced us to the innovative Aeropress. Conceived by the brilliant mind of Alan Adler, this brewing apparatus aimed to seamlessly blend simplicity with exceptional coffee quality.
The Aeropress wasn't just a coffee maker; it was a deliberate departure from traditional brewing methods. Its compact design, affordability, and capacity to deliver a consistently clean and flavorful cup elevated it to global acclaim among coffee aficionados.
Advantages of Aeropress Coffee Brewing
Let's delve into why the Aeropress has emerged as a favorite among coffee aficionados, showcasing its distinct advantages over other brewing methods:
1. Quick and Easy Brewing:
- Imagine craving a cup of coffee and having it in your hands within minutes. The Aeropress excels in simplicity and efficiency, providing a faster brewing process compared to more intricate methods. When time is of the essence, the Aeropress delivers your caffeine fix promptly.
2. Versatility in Brewing Styles:
- The Aeropress acts as a versatile maestro in the coffee orchestra, allowing you to craft your brew in multiple styles. Whether you desire a robust espresso-like shot or a smoother Americano, the Aeropress accommodates a spectrum of preferences. This flexibility sets it apart, especially when compared to methods with more rigid brewing outcomes.
3. Portable and Convenient:
- Need your coffee on the move? The Aeropress is your trusty companion. Its compact design and durability make it the ultimate travel brewing tool. While other methods might be cumbersome or require more equipment, the Aeropress ensures a high-quality cup of coffee anywhere, from a camping trip to a hotel room.
In summary, the Aeropress stands out by simplifying the brewing experience, offering creative adaptability, and providing a portable solution that outshines its counterparts
Disadvantages of Aeropress Brewing
As much as we adore the Aeropress, let's explore some aspects where it might not be the perfect fit, acknowledging its limitations compared to other brewing methods:
1. Limited Batch Size:
- The Aeropress shines when crafting a single cup of coffee, but if you're hosting a gathering or craving multiple cups, it might fall short. Other methods with larger capacities, like drip coffee makers or French presses, may better suit occasions that demand a larger brew.
2. Requires Manual Effort:
- While the manual process of the Aeropress can be a joy for some, it might not appeal to those seeking a more hands-off approach. Additionally automated methods, such as pod machines or drip coffee makers, offer a convenience that the Aeropress, with its plunging and pressing, doesn't entirely replicate.
3. Not Ideal for Hands-Off Brewing:
- Some coffee enthusiasts prefer a set-it-and-forget-it approach, and the Aeropress, with its manual involvement, may not align with this preference. Also if you value a brewing method that requires minimal intervention, exploring automatic options might be more suitable.
Understanding these limitations helps us appreciate the Aeropress for what it excels at while recognizing scenarios where alternative methods might be more fitting.
Best Types of Coffee for Aeropress
Embark on a flavorful journey as we explore the ideal coffee companions for your Aeropress. The key is selecting beans that harmonize with the Aeropress brewing method, and here are some specific recommendations:
1. Characteristics of Ideal Coffee Beans:
- Opt for freshly roasted beans with a flavor profile that aligns with your preferences. For instance, if you enjoy a bright and fruity cup, consider beans with notes of citrus, berries, or tropical fruits. For those inclined towards a richer experience, beans with chocolate, caramel, or nutty undertones may be more appealing.
2. Popular Coffee Varieties for Aeropress Brewing:
- Dive into the world of single-origin beans to discover nuanced flavors. Ethiopian coffee beans bring forth floral and citrusy notes, while Colombian beans offer a balanced profile with hints of cocoa. Guatemalan beans, with their chocolatey and spicy characteristics, also shine in the Aeropress.
3. Factors to Consider in Selecting Coffee for Aeropress:
- When it comes to roast level, the Aeropress welcomes a variety of options. Light to medium roasts often preserve the unique flavors of the beans, while some might prefer the depth of a dark roast. As for grind size, aim for medium to medium-fine to ensure optimal extraction without compromising the filter.
In essence, the Aeropress opens doors to a diverse spectrum of coffee experiences. Whether you prefer the vibrant acidity of Ethiopian beans or the comforting richness of Colombian coffee, the Aeropress adapts beautifully to your coffee exploration.
Step-by-Step Guide How to Make Coffee with an Aeropress
Now, let's embark on the exciting journey of brewing a perfect cup with your Aeropress. Now, this step-by-step guide will ensure you master the art and science of Aeropress brewing:
A. Equipment Needed:
- Aeropress
- Freshly ground coffee
- Kettle with hot water (about 200°F or 93°C)
- Stirring utensil
- Timer
- Filter (preferably paper)

B. Coffee-to-Water Ratio and Measurements:
- Start with a standard ratio of 1:15. For example, if you're using 15 grams of coffee, aim for 225 grams of water. Then, adjust based on your preferences, experimenting with ratios for a stronger or milder brew.
C. Grinding the Coffee Beans:
- Aim for a medium to medium-fine grind, resembling table salt. Consistent grind size ensures even extraction and a balanced flavor profile.
D. Brewing Techniques and Timing:
- Preheat the Aeropress:
- Assemble your Aeropress and place a filter in the cap. Then, preheat by pouring hot water through the device, then discard the water.
- Add Coffee and Water:
- Place the Aeropress on a sturdy mug. Add the coffee grounds, followed by the hot water. Then, stir the mixture for about 10 seconds to ensure even saturation.
- Brewing Time:
- Attach the plunger. Then, let the coffee steep for around 1-2 minutes. Then, adjust the time based on your desired strength. The shorter the steeping time, the milder the brew.
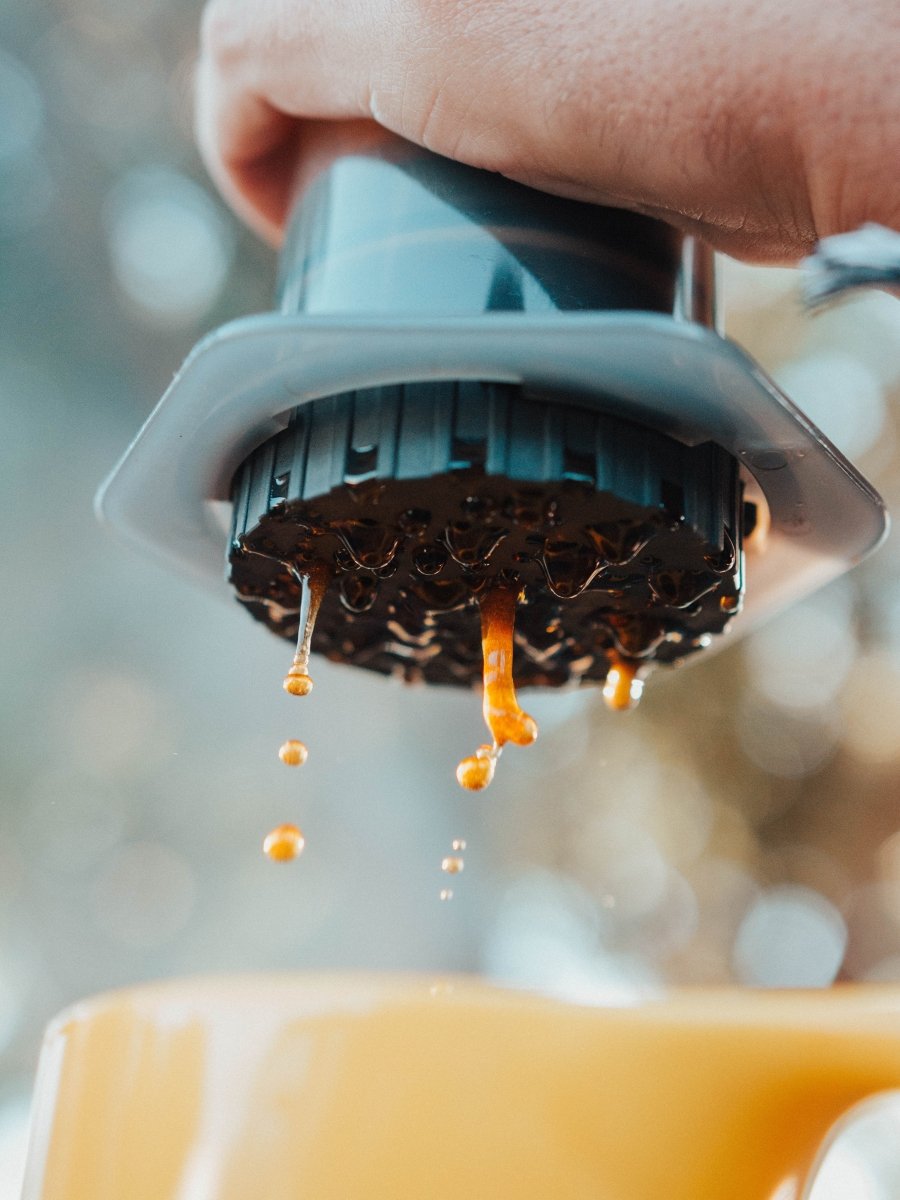
E. Plunging and Serving:
- Plunge Gently:
- Apply steady pressure to the plunger, aiming for a 20-30 second plunge. The gentle pressure ensures a smooth extraction.
- Serve and Enjoy:
- Once the plunge is complete, marvel at your freshly brewed Aeropress coffee. Lastly, dilute with hot water for an Americano or enjoy it as is for a concentrated espresso-like shot.
F. Variations in How to Make Coffee with an Aeropress:
- Get creative! Explore inverted brewing methods, different water temperatures, or experiment with bloom times to discover your signature Aeropress style.
G. Troubleshooting Tips:
- If your brew isn't perfect on the first try, fear not. Adjust the grind size, brewing time, or coffee-to-water ratio until you find your sweet spot.
H. Inverted Aeropress Technique:
- Assemble Upside Down:
- Begin with the Aeropress upside down, so the plunger is at the bottom. This provides more control over the brewing process.
- Add Coffee and Water:
- Next, add your coffee grounds followed by hot water, ensuring an even saturation. Give it a gentle stir to guarantee a consistent mix.
- Brewing Time:
- Allow the coffee to steep for the desired time. Remember, the inverted method often requires a longer steeping period for a bolder flavor.
- Attach and Plunge:
- Carefully attach the filter cap and swiftly flip the Aeropress onto your mug. Then, apply pressure to the plunger and start the plunge, taking around 20-30 seconds.
- Serve and Experiment:
- Behold, your inverted Aeropress creation! This method often results in a fuller-bodied cup. Experiment with steeping times and ratios to tailor your brew to perfection.

Photo by Ben Moreland on Unsplash